
Send emails with Laravel using Mailtrap's SMTP


Introduction to sending emails in Laravel
In any serious Laravel application, sending emails is crucial. Whether it’s a welcome email, a password reset email, etc., you need to make sure your they’re delivered to the right inbox every time.
One way to achieve this is to write reliable code. Another way is to use a reliable email-sending service.
That’s where Mailtrap comes into play. They provide a free and fast SMTP server for both sending and testing emails with a great delivery rate. Which is perfect to start our journey.
So, without further ado, let’s see how to send emails in Laravel using Mailtrap’s SMTP.
Setting up a Laravel project
Before I show you how to send emails in Laravel, let me show you how to set the project itself up first.
Configuration
Your best friend for configuring Laravel email services will be the config/mail.php file. It contains a mailers configuration array with a sample configuration entry for each major mail drivers/transports supported by Laravel.
The default configuration your new best friend config file has is exactly what determines which mailer will be used by default when you’re sending an email from your Laravel application.
This gives us plenty of flexibility, because thanks to the mailers configuration in the config/mail.php file, we can use different email-sending services for different types of emails.
Generating and writing mailables
In Laravel, a “mailable” class stored in the app/Mail directory represents different types of emails.
Note that you won’t be able to find the app/Mail directory in your application as it’s not present there by default. Instead, it’s generated when you create the first mailable class.
To do this, I used the following command of the Artisan CLI (included in Laravel):
php artisan make:mail MailableName
After creating a mailable class, I was able to see the contents and configure the class itself. For this, I used the methods in the table below:
| Method | Explanation |
| Envelope | Returns the Illuminate\Mail\Mailables\Envelope object, which defines the subject and the recipients. |
| Content | Returns the Illuminate\Mail\Mailables\Content object, which defines the Blade template used for generating message content. |
| Attachments | Returns an array of attachments. |
Sender configuration
Once we have our mailables, we need to specify the sender or the from email address and name. For this, we can either:
- Specify the sender in the message Envelope object:
use Illuminate\Mail\Mailables\Address;
use Illuminate\Mail\Mailables\Envelope;

/**
* Get the message envelope.
*
* @return \Illuminate\Mail\Mailables\Envelope
*/
public function envelope()
{
   return new Envelope(
       from: new Address('example@example.com', 'Test Sender'),
       subject: 'Test Email',
   );
}
- Specify the sender in config/mail.php with a global from address:
return [
    'from' => ['address' => 'example@example.com', 'name' => 'App Name']
];
Pro Tip: You should use the global from address if you plan to use it in all of the emails your application sends. I found this quite convenient as it prevented me from having to call from method in each of my mailable classes. On top of that, it served as my default from address as I didn’t specify any other.
How to send email in Laravel using Mailtrap Email Sending SMTP?
And finally, we’ve come to the fun part.
First I’ll show you how to set up Mailtrap as the SMTP in your application/project and then I’ll show you how I created the mailable classes and ran tests.
Insert Mailtrap SMTP credentials
The first thing I did was insert my SMTP mail server credentials provided by Mailtrap Email Sending into the .env of my application.
To do this, all you have to do is create a Mailtrap account, log in, and navigate to Sending Domains under Email Sending. There you need to add and verify your domain, which takes only a few seconds.
If you’re a visual learner, Mailtrap has an easy-to-follow video for you.
Once you’ve verified your domain, Mailtrap will take you to the page from where you can copy the SMTP credentials and easily paste them into your project, app, or email-sending service.
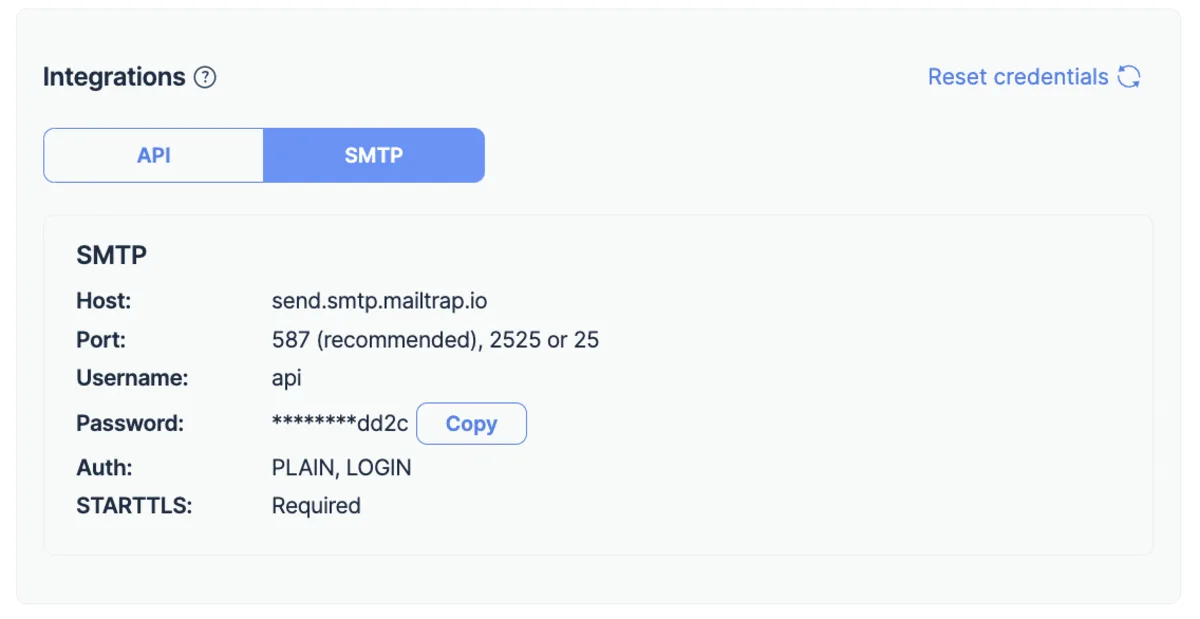
And here’s what your credentials should look like once you integrate them into your Laravel code:
// .env file

MAIL_MAILER=smtp
MAIL_HOST=live.smtp.mailtrap.io
MAIL_PORT=2525
MAIL_USERNAME=//your username
MAIL_PASSWORD=// your password
MAIL_ENCRYPTION=tls
MAIL_FROM_ADDRESS=from@example.com
MAIL_FROM_NAME=//your app name
Verify your SMTP setup
Once I inserted the credentials and sent a test mail from my Laravel project, Mailtrap verified my SMTP setup.
Here’s what you should receive as a response if your test email was sent successfully:
- “250 2.0.0 Ok: queued as …”
Then, simply click on the “Verify Setup,” which will start the verification process.

Enable Mailtrap tracking settings (optional)
Now, this step is optional, but I highly recommend it as it allows me to monitor my email performance.
Namely, Mailtrap provides you with in-depth analytics through which you can keep an eye out on your opens, clicks, bounces, and more.
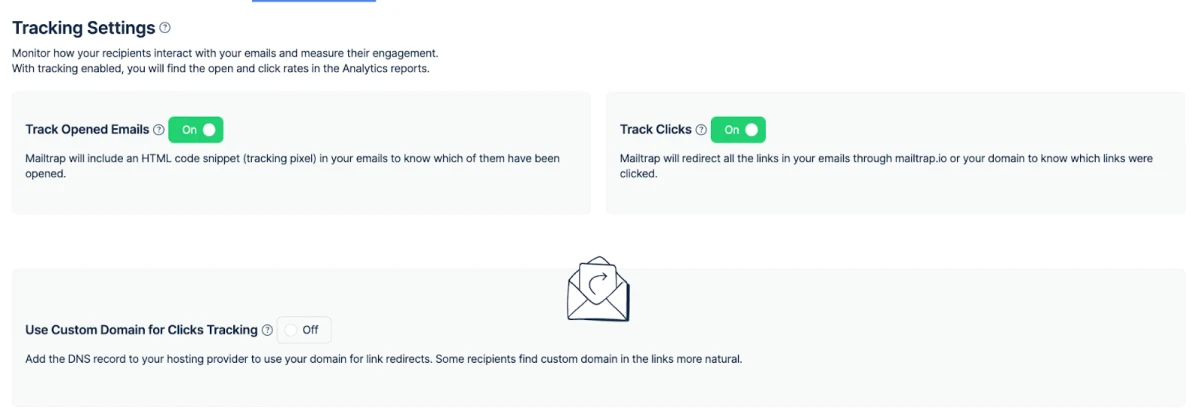
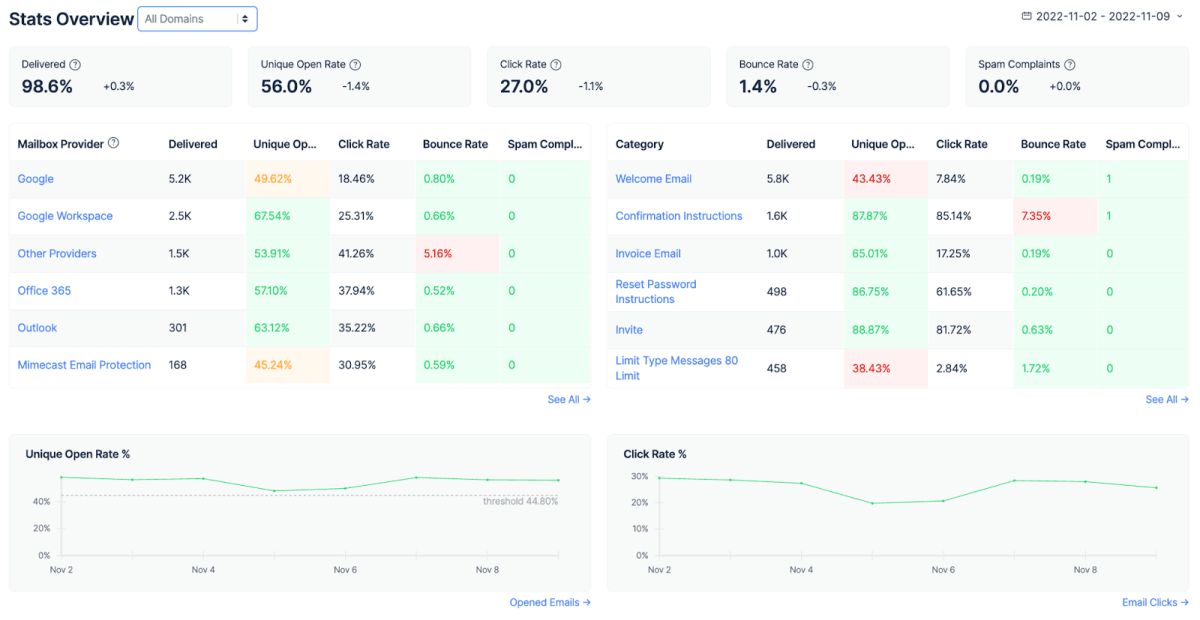
Here’s what I see when I open my stats:

And here’s the stats overview:
Create mailable classes
Remember those mailable classes I told you about previously? It’s time to create them with the following command:
php artisan make:mail MyTestEmail
After running this command, you should see the MyTestEmail class under “app/mailMyTestEmail.php”.

Here’s the class code for your convenience:
namespace App\Mail;

use Illuminate\Bus\Queueable;
use Illuminate\Contracts\Queue\ShouldQueue;
use Illuminate\Mail\Mailable;
use Illuminate\Mail\Mailables\Content;
use Illuminate\Mail\Mailables\Envelope;
use Illuminate\Queue\SerializesModels;

class MyTestEmail extends Mailable
{
    use Queueable, SerializesModels;

    /**
     * Create a new message instance.
     *
     * @return void
     */
    public function __construct()
    {
        //
    }

    /**
     * Get the message envelope.
     *
     * @return \Illuminate\Mail\Mailables\Envelope
     */
    public function envelope()
    {
        return new Envelope(
            subject: 'My Test Email',
        );
    }

    /**
     * Get the message content definition.
     *
     * @return \Illuminate\Mail\Mailables\Content
     */
    public function content()
    {
        return new Content(
            view: 'view.name',
        );
    }

    /**
     * Get the attachments for the message.
     *
     * @return array
     */
    public function attachments()
    {
        return [];
    }
}
See anything interesting? That’s right, the content() method returns a view. So, let’s go to resources/views and create a new folder with a blade.php file in it.
Ready to finally write some text? You can do so in the blade.php file, likewise:

Now, let’s return to the content() method and replace the name of the view it returned with the name of our newly created one.
You can also make things a bit more dynamic by making your email template/blade.php file include the recipient’s name using the with attribute to pass the name.
Check it out.
namespace App\Mail;

use Illuminate\Bus\Queueable;
use Illuminate\Contracts\Queue\ShouldQueue;
use Illuminate\Mail\Mailable;
use Illuminate\Mail\Mailables\Content;
use Illuminate\Mail\Mailables\Envelope;
use Illuminate\Queue\SerializesModels;

class MyTestEmail extends Mailable
{
    use Queueable, SerializesModels;

    /**
     * Create a new message instance.
     *
     * @return void
     */
    public function __construct(private $name)
    {
        //
    }

    /**
     * Get the message envelope.
     *
     * @return \Illuminate\Mail\Mailables\Envelope
     */
    public function envelope()
    {
        return new Envelope(
            subject: 'My Test Email',
        );
    }

    /**
     * Get the message content definition.
     *
     * @return \Illuminate\Mail\Mailables\Content
     */
    public function content()
    {
        return new Content(
            view: 'mail.test-email',
            with: ['name' => $this->name],
        );
    }
}
To make this work, I had to make a small change in the test-email.blade.php view file as well. What this does is it allows it to accept the $name variable.
// resources/views/mail/test-email.blade.php

Hey {{$name}},
Can your Laravel app send emails yet? 😉
Mailtrap
And lastly, let’s create a route in the routes/web.php file with this code:
use Illuminate\Support\Facades\Route;
use App\Mail\MyTestEmail;
use Illuminate\Support\Facades\Mail;

Route::get('/testroute', function() {
    $name = "Funny Coder";

    // The email sending is done using the to method on the Mail facade
    Mail::to('testreceiver@gmail.com'')->send(new MyTestEmail($name));
});
Here’s how the file should look then:

And, the moment of truth has come. I tested things out by running php artisan serve command and going to my browser, where I pasted the route I created. In my case, it was localhost:8000/testroute.
In case everything works, your email should land in the inbox of the “to” address you specified.
How to send HTML emails in Laravel
Sending attention-grabbing emails in Laravel is quite simple. All you have to do is add HTML code to your Blade view file. If you remember, we used test-email.blade.php in this guide.
And this is how your plain text email should look like in HTML form:
<!DOCTYPE HTML>
<html lang="en">
    <head>
        <meta charset="UTF-8">
        <meta name="viewport"
            content="width=device-width, user-scalable=no, initial-scale=1.0, maximum-scale=1.0, minimum-scale=1.0">
        <meta http-equiv="X-UA-Compatible" content="ie=edge">

        <style>
            p {
                font-size: 12px;
            }

            .signature {
                font-style: italic;
            }
        </style>
    </head>
    <body>
        <div>
            <p>Hey {{ $name }},</p>
            <p>Can your Laravel app send emails yet? 😉 </p>
            <p class="signature">Mailtrap</p>
        </div>
    </body>
</html>
How to send email with attachments in Laravel
To add attachments to my emails in Laravel, I simply modified the attachments method in the example code for sending emails I showed you earlier.
I first made them in the MyTestEmail class:
namespace App\Mail;

use Illuminate\Bus\Queueable;
use Illuminate\Mail\Mailable;
use Illuminate\Mail\Mailables\Content;
use Illuminate\Queue\SerializesModels;
use Illuminate\Mail\Mailables\Envelope;
use Illuminate\Mail\Mailables\Attachment;
use Illuminate\Contracts\Queue\ShouldQueue;

class MyTestEmail extends Mailable
{
    use Queueable, SerializesModels;

    /**
     * Create a new message instance.
     *
     * @return void
     */
    public function __construct(private $name, public $attachedFile){ }

    /**
     * Get the message envelope.
     *
     * @return \Illuminate\Mail\Mailables\Envelope
     */
    public function envelope()
    {
        return new Envelope(
            subject: 'My Test Email',
        );
    }

    /**
     * Get the message content definition.
     *
     * @return \Illuminate\Mail\Mailables\Content
     */
    public function content()
    {
        return new Content(
            view: 'mail.test-email',
            with: ['name' => $this->name],
        );
    }

    /**
     * Get the attachments for the message.
     *
     * @return array
     */
    public function attachments()
    {
        return [
            Attachment::fromPath($this->attachedFile),
        ];

    }
}
Then I made some changes in the testroute code under routes/web.php:
use Illuminate\Support\Facades\Route;
use App\Mail\MyTestEmail;

Route::get('/testroute', function () {

    $filePath = public_path('favicon.ico');

    $name = "Funny Coder";

    Mail::to('testreceiver@gmail.com'')->send(new MyTestEmail($name, $filePath));
});
And that’s pretty much it. If you used this code, your email should now come with an ICO attachment named favicon.ico, as you can see in the snippet above.
How to send emails to multiple recipients in Laravel
To send emails to multiple people in Laravel, I used the following code:
foreach (['First Coder' => 'first-recipient@gmail.com', 'Second Coder' => 'second-recipient@gmail.com'] as $name => $recipient) {
    Mail::to($recipient)->send(new MyTestEmail($name));
}
What this code does is iterate over an array of recipients. It also re-creates the mailable instance each time, which is super useful as it prevents the sending of another email to every previous recipient at every iteration through the loop. Just imagine the headache. 🤕
“But how do I send emails to just one recipient while also cc-ing and bcc-ing a few others?,” you might be wondering. Simply follow this example in the MyTestEmail class:
return new Envelope(
    subject: 'My Test Email',
    cc: ['testreceiver-cc@gmail.com'],
    bcc: ['testreceiver-bcc@gmail.com']
);
How to test email sending and emails with Mailtrap Email Testing
If you don’t want to have your emails sent from a blacklisted domain, marked as spam, or their HTML template poorly rendered by web browsers, you should test your emails.
Yes, you can do this with your personal inbox, but why affect your domain reputation and floods your inbox with junk, when you can use Mailtrap Email Testing?
Besides allowing you to send emails, Mailtrap also comes with other benefits that can help you solve numerous testing problems while keeping the email testing process secure.
Namely, Mailtrap Email Testing gives you a sandbox where you can catch testing emails and then preview them, check their spam score, analyze their HTML/CSS, and more before you send them out.

Compared to testing emails with your personal inbox, Mailtrap Email Testing keeps things neatly organized by allowing you to create multiple inboxes for different projects and their stages.
This testing solution also provides you with the original values of email headers and the option to forward your testing emails to whitelisted recipients, either manually or automatically.
And what I like the most about Email Testing is that it will only take you a few minutes to set it all up. All you have to do is:
- Log in to your Mailtrap account
- Navigate to Email Testing → Inboxes → SMTP Settings
- Select the desired Laravel version from the list of integrations

- Copy the code snippet generated by Mailtrap and paste it into your email-sending script
- Run the script
As a result, you should get the test email in your Email Testing virtual inbox.
Mailtrap Email Testing will also provide you with SMTP credentials for each of your inboxes, which you can find by clicking on “Show Credentials” on the SMTP Settings page. This way, you can use credentials over code snippets for integrating this testing solution. You can simply copy and paste them into your email-sending script, MTA settings, email client settings, or any system that supports them.
Alternatively, you can also integrate Email Testing into your Laravel app via Mailtrap email API. For more details, check out the official API documentation.
Wrapping up
And that’s it!
I’ve shown you how I send emails in Laravel with Mailtrap SMTP and how I test them with the Email Testing solution.
Hopefully, you’ll be able to use this article as your go-to resource for sending emails in Laravel.
Good luck!


