7 minutes read
Use Laravel to build a ChatGPT plugin
 Written by
Table of contents
- → Introduction
- → So, what exactly is a ChatGPT plugin?
- → Let ChatGPT interact with your Laravel app through a REST API
- → Expose your API to ChatGPT with an OpenAPI Specification
- → Create a manifest to make your API a ChatGPT plugin
- → Testing your plugin in the ChatGPT UI
- → Submitting your plugin to OpenAI
Introduction
Plugins for ChatGPT have been discontinued. Create a custom GPT instead.
If you’re here, it means you’re interested in the fascinating world of AI, and you’re ready to dive deeper into what ChatGPT plugins are all about.
If you’re here, it means you’re interested in:
- Building ChatGPT plugins. This is the right place, so keep reading.
- Creating innovative new features for your Laravel-based projects by leveraging the power of the GPT language model. In that case, this is still the right place, but the wrong article! I suggest you read “AI with PHP using OpenAI’s API + GPT-3.5 (ChatGPT)“
Still there? Follow along; this will be fun and way simpler than you think!
(A ChatGPT plugin requires you to build a REST API. But I won’t explain how to create one with Laravel here. The web and Laravel’s documentation are already filled with content to help you with this task.)
So, what exactly is a ChatGPT plugin?
In simple terms, plugins are mini sidekicks to our AI friend, ChatGPT.
They’re tools that you can create to make ChatGPT smarter and more helpful.
It’s like giving ChatGPT a new set of skills or knowledge, kind of like how a smartphone app gives your phone new capabilities.
Learn more:
- Read the announcement blog post from OpenAI to get a good overview of what ChatGPT plugins are.
- Read the documentation of ChatGPT plugins.

Let ChatGPT interact with your Laravel app through a REST API
Creating a REST API is an essential step in the journey of building a ChatGPT plugin.
This API will serve as the communication link between your plugin and the external service or database it interacts with.
Here’s a plan of action for your new API:
- Identify your needs: Understand what your plugin is going to do and the data it will need to fetch.
- Design and implement your API: Define your endpoints and build it using Laravel’s routing, controllers, validation, Eloquent ORM and API resources, etc.
- Test your API: Laravel is a master at helping you write robust feature tests.
- Deploy your API: The framework is compatible with numerous cloud platforms for deployment, so it’ll be super easy.
Expose your API to ChatGPT with an OpenAPI Specification
The OpenAPI Specification is a language-agnostic blueprint for REST APIs that allows both humans and computers to discover and understand the capabilities of your service.
As said earlier, in the context of ChatGPT plugin development, it serves as a bridge between your API and the ChatGPT system.
This bridge enables ChatGPT to understand how to interact with your API, what data it can expect to send and receive, and how to handle different scenarios. In essence, it’s the protocol for introducing your API to ChatGPT.
An OpenAPI specification document is organized into several key sections:
- Info: Contains general information about the API, such as the title, description, version, and contact information.
- Servers: Specifies the URL where your API can be accessed.
- Paths: Lists the API endpoints with detailed information about each, including the HTTP methods available, parameters, request body schema, and response schema.
- Components: Provides reusable components for the API, such as schemas (representations of the data models) and security schemes.
Here’s an example of how the document looks like using the JSON format:
{
  "openapi": "3.0.0",
  "info": {
    "version": "1.0.0",
    "title": "Book Information API",
    "description": "This API retrieves book information by ISBN.",
    "contact": {
      "name": "API Support",
      "email": "support@example.com"
    }
  },
  "servers": [
    {
      "url": "https://api.example.com/v1"
    }
  ],
  "paths": {
    "/books/{isbn}": {
      "get": {
        "summary": "Retrieves a book",
        "description": "Retrieves detailed information about a book by its ISBN.",
        "parameters": [
          {
            "name": "isbn",
            "in": "path",
            "required": true,
            "description": "ISBN of the book to retrieve.",
            "schema": {
              "type": "string"
            }
          }
        ],
        "responses": {
          "200": {
            "description": "A book object",
            "content": {
              "application/json": {
                "schema": {
                  "$ref": "#/components/schemas/Book"
                }
              }
            }
          },
          "404": {
            "description": "Book not found"
          }
        }
      }
    }
  },
  "components": {
    "schemas": {
      "Book": {
        "type": "object",
        "properties": {
          "title": {
            "type": "string"
          },
          "author": {
            "type": "string"
          },
          "publishedDate": {
            "type": "string"
          },
          "summary": {
            "type": "string"
          }
        }
      }
    }
  }
}
To create a specification for your plugin, you can use the zircote/swagger-php package.
You must generate an openapi.json file (or whatever.json) that is publicly accessible and will then be linked inside the manifest (we will discuss this in the next section):
php vendor/bin/openapi app -o public/openapi.json
Create a manifest to make your API a ChatGPT plugin
To let ChatGPT know about your plugin, you have to create a manifest. It’s essentially your plugin’s ID card, filled with JSON that tells everything ChatGPT needs to know about it.
The manifest includes several fields that are crucial to correctly presenting and functioning your plugin. Here’s a breakdown of these required fields and their significance:
api_schema: This is a link to the OpenAPI specification for the APIs that the plugin uses. It’s how ChatGPT learns to interact with your API. We saw how to generate in the previous section.
id: A unique identifier for your plugin. Think of it as the username for your plugin—it’s how ChatGPT refers to your plugin.
name: This is the display name for your plugin, which users will see in the ChatGPT interface.
version: The current version of your plugin. This helps track updates and changes made to the plugin.
description: A brief explanation of what your plugin does. It’s your chance to sell your plugin to the users—make it clear and compelling.
operations: This section describes the different actions that your plugin can perform. Each operation has a unique ID, a name, and a description.
Here’s how your manifest should look:
{
  "api_schema": "https://example.com/openapi.json",
  "id": "com.example.myplugin",
  "name": "My Plugin",
  "version": "1.0.0",
  "description": "This plugin does amazing things with ChatGPT",
  "operations": [
    {
      "id": "operation1",
      "name": "Operation One",
      "description": "This operation performs the first amazing thing."
    },
    {
      "id": "operation2",
      "name": "Operation Two",
      "description": "This operation performs the second amazing thing."
    }
  ]
}
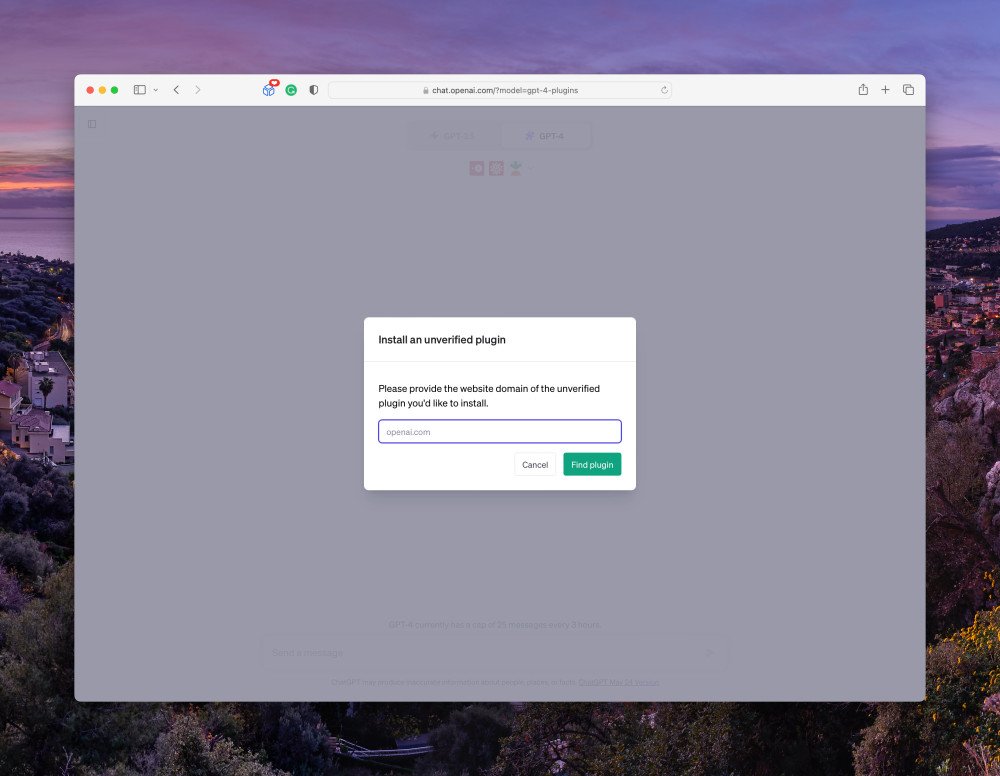
Testing your plugin in the ChatGPT UI
Once your API and manifest are ready, it’s essential to test the plugin thoroughly to ensure your users’ satisfaction.
- Open the ChatGPT UI and log in to your account.
- Select the plugin model from the top dropdown list.
- Navigate to “Plugins,” then click on “Plugin Store.”
- Choose either “Install an unverified plugin” or “Develop your own plugin” based on your preference.
- Provide an OAuth 2 client_id and client_secret or an API key if authentication is necessary.
By following these steps, you can add your fresh new plugin into ChatGPT’s environment for testing.
Limitations of the testing environment
As with any application development process, there are certain limitations when it comes to working within a test environment:
- Only other developers can currently install unverified plugins; regular users do not have access until approval.
- During alpha stages of development, a developer’s access is limited—you can share their plugins only with 15 additional users.
Submitting your plugin to OpenAI
Submitting your plugin for approval is extremely simple:
- Ensure your plugin meets all criteria mentioned in the “Plugin Store“ section.
- Log in to ChatGPT and use the plugin submission bot to submit your plugin.
- Wait for feedback within approximately 14 days as OpenAI perform review on a rolling basis.
It’s possible to check your submission status under “Help” > “Messages”.

Did you like this article? Then, keep learning:
- Step-by-step API usage guide for GPT-3.5 Turbo relevant to AI plugin development
- Step-by-step API usage guide for GPT-4 Turbo for advanced AI integration
- Introductory and insightful explanation of how GPT and language-based AIs work
- Detailed Laravel explanation useful for understanding the framework used in plugin building
- Overview of Laravel's version changes helpful for maintaining Laravel apps and plugins
- Step-by-step guide to upgrading Laravel versions, helpful for keeping plugin projects updated
- Guide on creating APIs with best practices that complement plugin development
- Guide on securing REST APIs with Laravel Sanctum, important for plugin security
- Tutorial on testing best practices in Laravel, vital for robust API and plugin development
- Comprehensive guides on using OpenAI's GPT APIs relevant for extending AI functionality


0 comments